These FAQs provides quick answers to common questions about setting up and customizing our theme. It's a handy resource for streamlining your theme implementation and resolving queries efficiently.
Updating your theme.
Will my content get overwritten after updating the theme?
No, your content will not get overwritten to the default content after updating the theme. In the rare case that it does happen to you, feel free to reach out to the Sprocket Rocket Support Team.
I created a child theme, will updating the theme affect the child theme as well?
Yes. Generally, without cloning the files to the child theme, updated changes in the parent theme will reflect in the child theme.
I created a child theme and cloned everything from the parent theme to the child theme, will updating the theme affect the child theme as well?
Not exactly, a file in the same relative path of a child theme will overwrite the equivalent file from the parent theme. What this translates to is that, even after updating the parent theme, cloned files in the child theme will not be affected till they are manually updated to match the files in the parent theme.
How to update Sprocket Rocket
To edit the blog post sidebar, please follow the instructions outlined here.
Custom CSS
To add custom CSS to the Sprocket Rocket Theme, follow these steps:
- In your HubSpot account, navigate to Marketing > Files and Templates > Design Tools.
- Next, navigate to your Sprocket Rocket theme.
- Create a CSS file in the css folder called custom-styles.css
- Any CSS added to this file will be included on every page of your site.
Custom Fonts
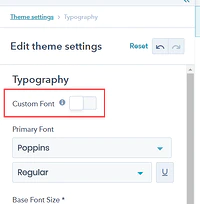
To use custom fonts, go to your theme settings and navigate to Typography. Enable Custom Font there. This will hide the font fields in the theme settings, but you can still adjust the size and line height from the theme settings.
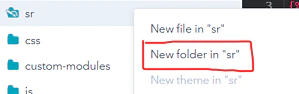
Next, go to the Design Manager. To find it, navigate to Marketing > Files and Templates > Design Tools in the top navigation bar.
Locate the SR folder and click on it. Next, right-click the SR folder and add a new folder named fonts .
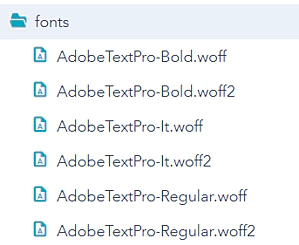
To add your font files, right-click the fonts folder and select Upload file in 'fonts' Then, upload all of your font files into the folder.
In this example, we are using Adobe Text Pro and we have three different fonts we want to use, so it should look something like this.
To begin, search for _fonts.css and click on it.
Next, add the following code to the top of the CSS file, replacing the font details with your own. This will ensure that your fonts work across all old and new browsers, including WOFF and WOFF2 formats.
In the example below, you can see that we repeated font-family: "Adobe Text Pro" for all fonts, but the font-weight and font-style are different.
Remember to replace AdobeTextPro-Regular.woff2 and AdobeTextPro-Regular.woff with the names of your font files.
@font-face {
  font-family: "Adobe Text Pro";
  font-weight: 400;
  font-style: normal;
  src:
 url({{get_asset_url('../fonts/adobe-text-pro.woff')}}) format('woff2'),
 url({{get_asset_url('../fonts/adobe-text-pro.woff')}}) format('woff');
  font-display: swap;
}

@font-face {
  font-family: "Adobe Text Pro";
  font-weight: 400;
  font-style: italic;
  src:
 url({{get_asset_url('../fonts/adobe-text-pro.woff')}}) format('woff2'),
 url({{get_asset_url('../fonts/adobe-text-pro.woff')}}) format('woff');
  font-display: swap;
}

@font-face {
  font-family: "Adobe Text Pro";
  font-weight: 600;
  font-style: normal;
  src:
 url({{get_asset_url('../fonts/adobe-text-pro.woff')}}) format('woff2'),
 url({{get_asset_url('../fonts/adobe-text-pro.woff')}}) format('woff');
  font-display: swap;
}
To add your font to the font-family rule for the body , h1 , h2 , h3 , etc., simply include your font name. If you have multiple custom fonts, feel free to use any of them for each style.
body {
  font-family: "Adobe Text Pro";
}
h1,
.h1 {
  font-family: "Adobe Text Pro";
}
h2,
.h2 {
  font-family: "Adobe Text Pro";
}
h3,
.h3 {
  font-family: "Adobe Text Pro";
}
h4,
.h4 {
  font-family: "Adobe Text Pro";
}
h5,
.h5 {
  font-family: "Adobe Text Pro";
}
h6,
.h6 {
  font-family: "Adobe Text Pro";
}
.display-1 {
  font-family: "Adobe Text Pro";
}
.display-2 {
  font-family: "Adobe Text Pro";
}
.display-3 {
  font-family: "Adobe Text Pro";
}
.display-4 {
  font-family: "Adobe Text Pro";
}
.lead,
.large {
  font-family: "Adobe Text Pro";
}
blockquote {
  font-family: "Adobe Text Pro";
}
.btn,
.btn-wrapper.cta_button,
.btn-wrapper.cta-button,
.btn-wrapperinput[type="submit"],
.btn-wrapperinput[type="button"],
input[type="submit"],
input[type="button"] {
  font-family: "Adobe Text Pro";
}
.navbar.navbar-nav.dropdown.dropdown-item,
.navbar.navbar-nav.nav-link,
.btn-wrapper.btn-primary-wrapper.d-xl-inlinea,
.no-button.header__menu-link,
.header__menu-link {
  font-family: "Adobe Text Pro";
}